Oh, wait. This post contains Amazon affiliate links, the meaning of which is — we will receive a monetary incentive from Amazon if you purchase products using the links (with no additional cost from your wallet).
Of course, if you hire a professional landscaper or a plumber to replace or fix a sprinkler valve, you will not need to go over this article (but you are still very welcome to read it). Before you search for plumbing or landscaping professionals in your area, let me just tell you that Sprinkler valves are pretty inexpensive (may vary between $10 to $25). Other accessories will require $10 to $20 dollars more. Many houses come with sprinkler controllers installed but the irrigation pipes are not in place. You will need to purchase a sprinkler controller if you don’t have one. The price of a sprinkler controller may vary between $30 to a few hundred dollars. I will go with a non-smart controller, which costs $30 to $60 dollars. Smart ones may cost up to a few hundred.
The sprinkler controller we use is an Orbit Sprinkler System 4-Station Standard Indoor Mounted Control Timer. This can control a maximum of four sprinkler valves. We are using the controller to schedule irrigation using two sprinkler valves — one for our front yard and one for our backyard. In this post, we will explain how to install one sprinkler valve. Of course, if you can install one, you can install four to water four zones of your garden at different times. The focus of the post is the sprinkler valve only. The pictures will show how to connect the wires from the sprinkler valve to the sprinkler controller.
What is a sprinkler valve
Really? Yes, we should explain this because we were not familiar with the jargon of plumbing and landscaping a few months ago. A Sprinkler Valve is simply a switch for water lines. Instead of manually turning a switch on or off, we would like to control the switch electronically from inside the house. We would love to control and schedule the watering time using a Sprinkler Controller. That’s it — a sprinkler valve is a switch to turn an irrigation line on or off. It cannot control the amount of water. It has just two modes — on and off. Well … some valves have physical knobs to control water pressure but we are not focusing on those in this post.
What are my sprinkler valve options
Hmm … let me think. There are many tiny and vital features associate with Sprinkler Valves. To my understanding, there are two major features. One type of sprinkler valve contains anti-siphon technology and the other type does not have the anti-siphon thingy. Anti-siphon sprinkler valves prevent back-flow of water. That means water from the irrigation line CANNOT go back to the domestic line when an Anti-siphon sprinkler valve is used. It is necessary to prevent back-flow because the water inside the irrigation pipes may get contaminated easily by the garden soil.
When there is a “with” option, we have a tendency to avoid the “without” option. This is especially because “without” sounds negative. When it comes to sprinkler valves, the “with” and “without” anti-siphon options have some pros and cons. The following table shows a quick comparison.
Look
Back-flow prevention
Height requirement
In-line placement
Installation and maintenance
Price
Amazon link
Anti-Siphon Sprinkler Valve
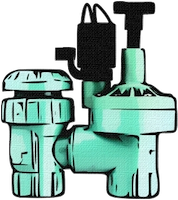
Yes
Must be installed at least 6″ above the highest sprinkler head.
Not possible due to height requirements
More complex
Inexpensive
Regular Sprinkler Valve
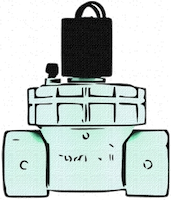
No
Can be installed at any height, even below the surface level.
Suitable for in-line placement
Easy
Inexpensive
You will need to decide which one you prefer based on your requirements. The regular sprinkler valve is preferable when your irrigation line already has an anti-siphon mechanism installed. When we purchased our house, we found that we already have an extension of the water line coming out of the house which already has an anti-siphon mechanism installed on the extended part. Therefore, we preferred the sprinkler valve without the anti-siphon thingy. As an added safety, we included an in-line 3/4″ PVC check valve to further prevent back-flow of water.
What does a check valve do?
The picture below explains how check valves work (and what it does). Very expressive … isn’t it? A check valve simply maintains a one-way flow of water.
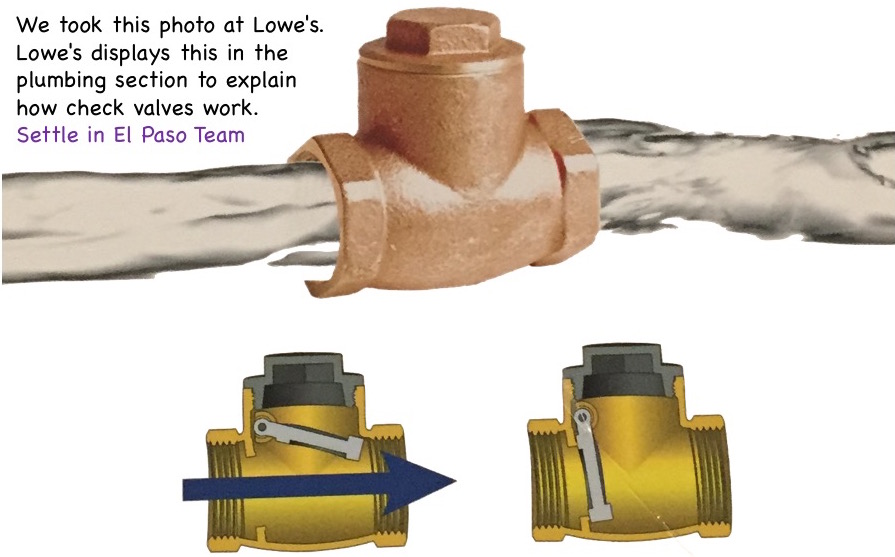
Just remember that a PVC check valve is made of plastic, not copper or any metal. If your irrigation line starts with PVC pipes, you will need a PVC check-valve. Please find a picture and details of a PVC check valve in this Amazon product link.
Sprinkler valve installation
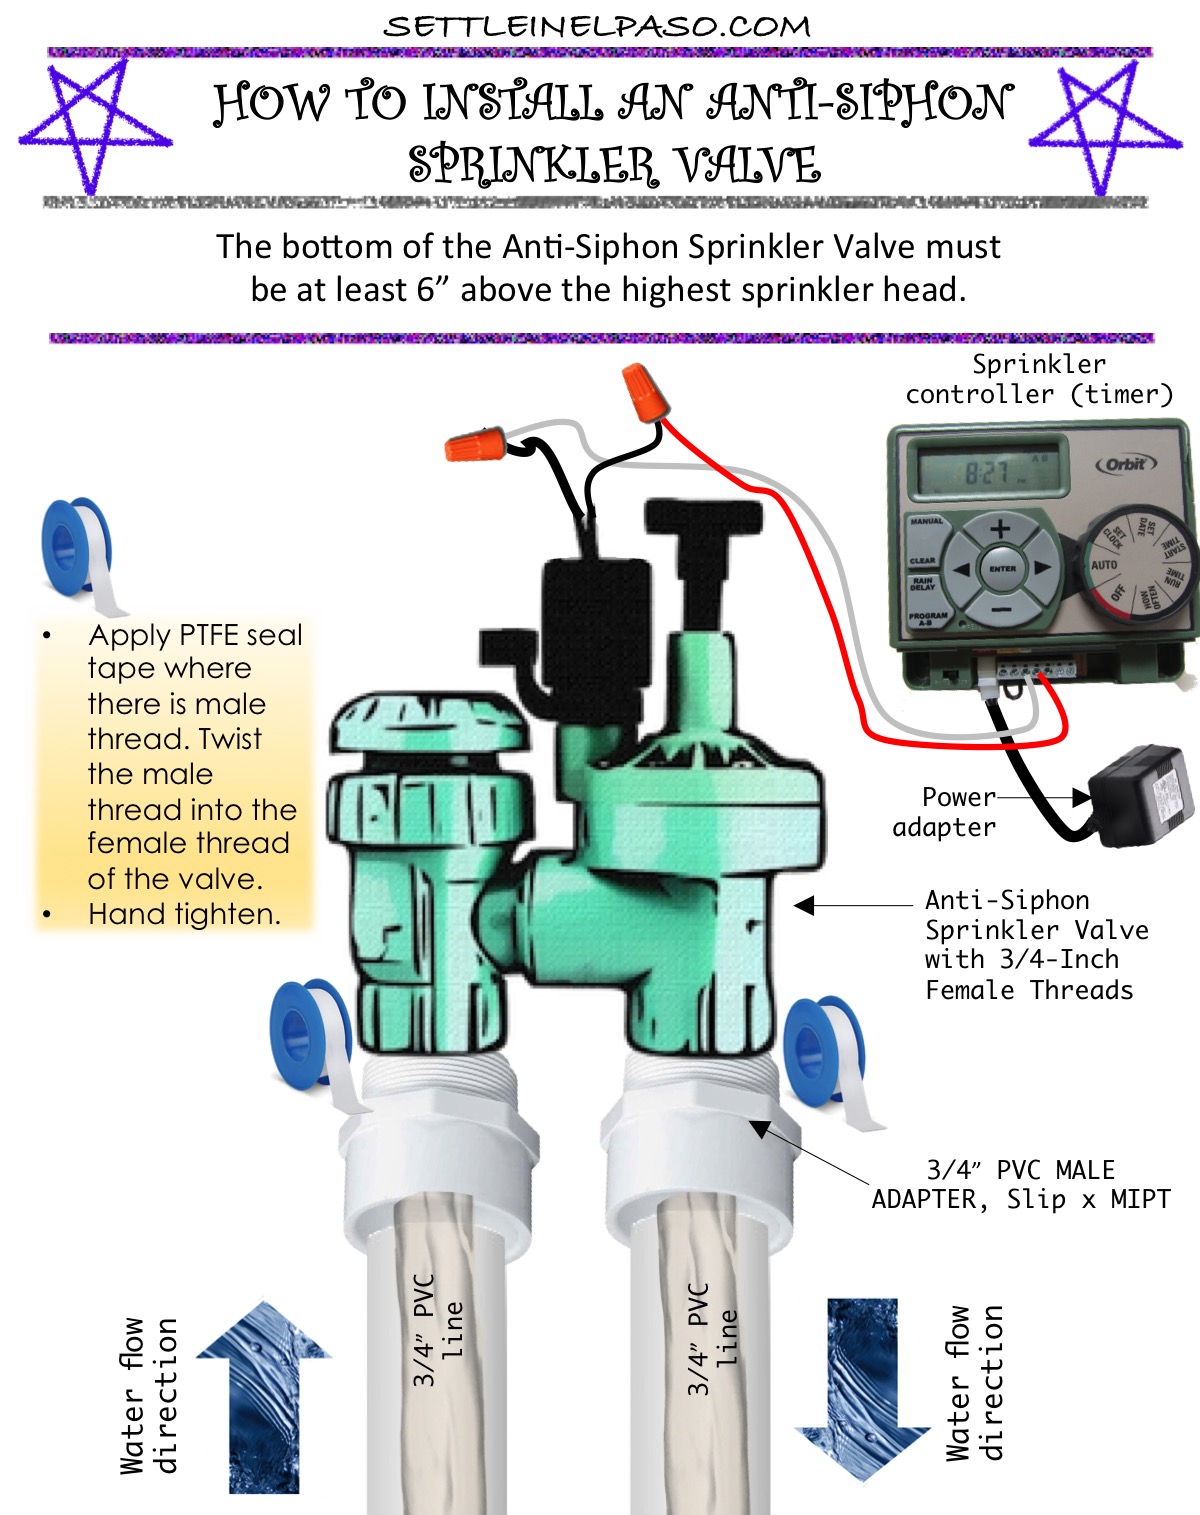
Now that we know what a sprinkler valve is and what our options are, we can talk about how to install it. Installation is straight forward. If you use the anti-siphon version, you will need to make sure that the bottom of the sprinkler valve is placed at least 6″ above the highest sprinkler head. If you don’t maintain the height requirement, I am sad to say that you will suffer some consequences. 🙁 It is how it is. The valve leaks here and there if the height does not meet the requirement. We installed the anti-siphon version first and then had to replace it because we did not maintain the height requirement. Since our plumbing system already has an anti-siphon mechanism, we then decided to use a regular sprinkler valve.
How to install an anti-siphon sprinkler valve
Each side of the anti-siphon sprinkle valve needs to be connected to a 3/4” PVC male adapter (Slip x MIPT). The MIPT (Male (Iron) Pipe Thread) part of the adapter will go inside the female thread of the sprinkler valve. Always apply PTFE seal tape on the male thread. Twist the male thread into the female thread of the valve and then hand tighten.
The installation setup for an anti-siphon sprinkler valve is shown in the image below. A PDF version of the image is uploaded in this link. The PVC pipes will directly go inside the Slip side of the adapter and be glued. How to glue is not explained in the picture below but it is explained in another picture later in this post. Use primer and PVC cement to glue the PVC pipe with the adapter.
How to install a regular sprinkler valve (the easy way)
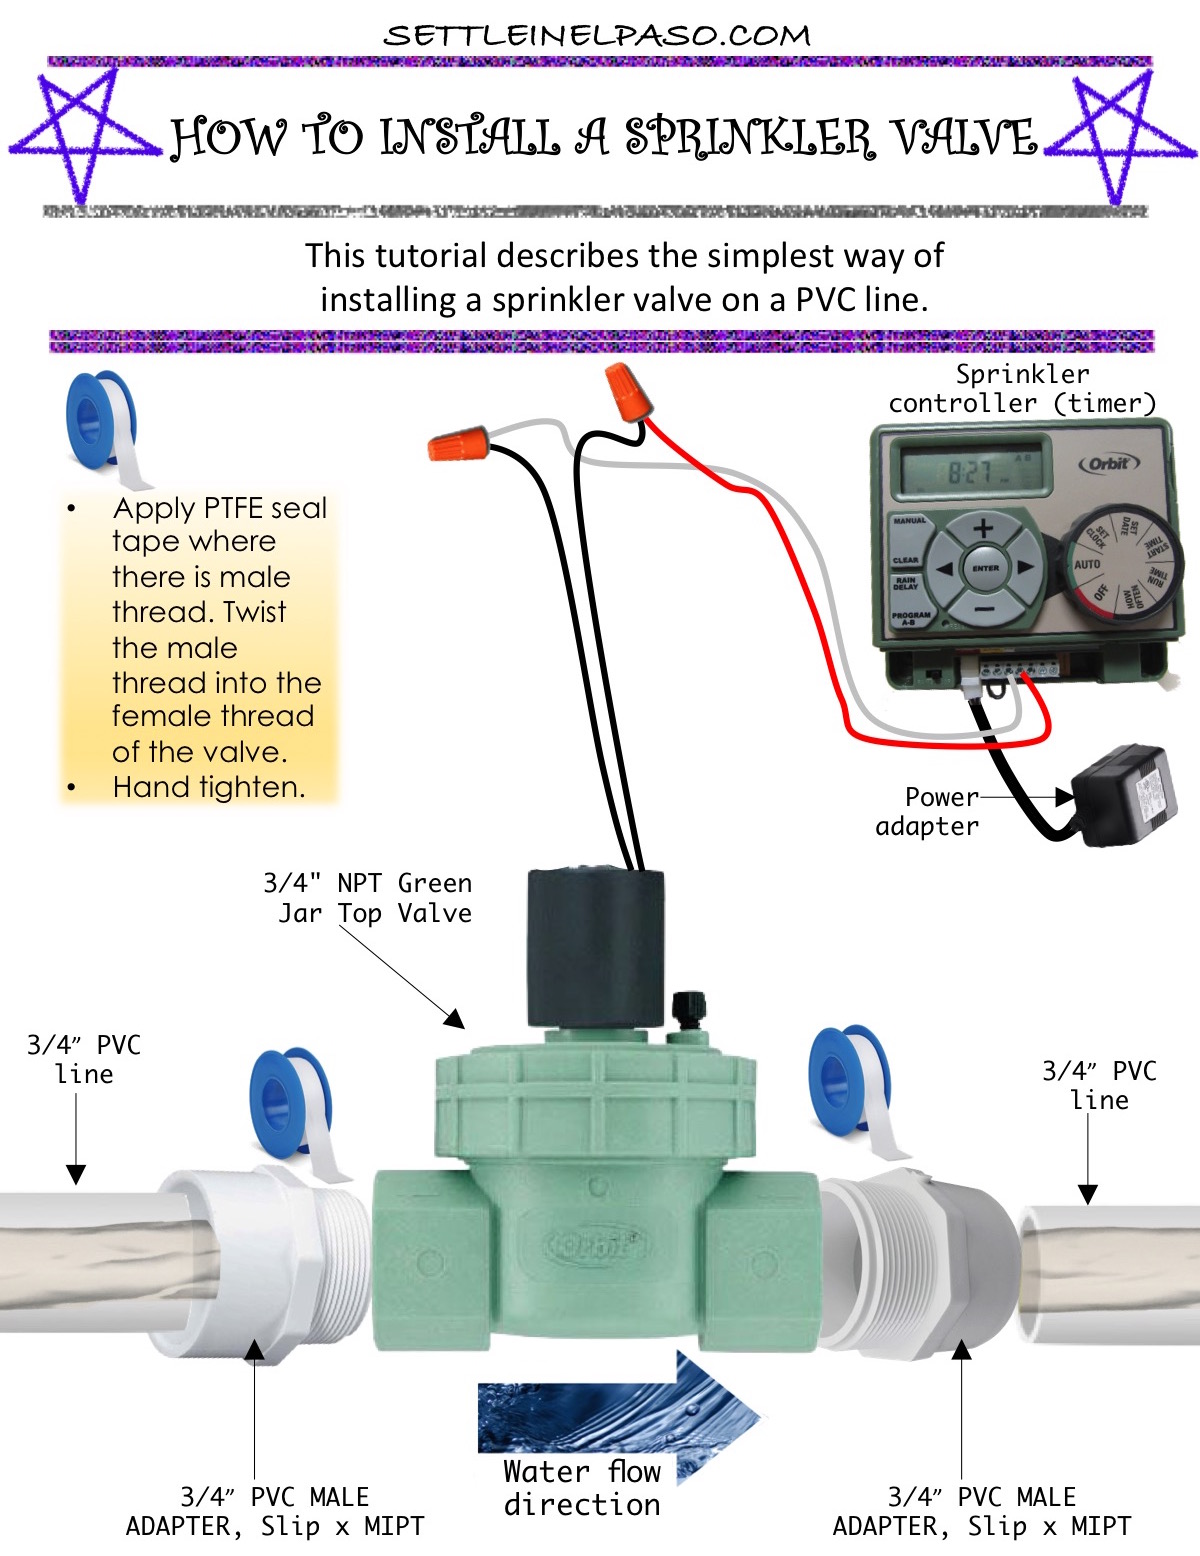
Installing a regular sprinkler valve is easier than installing the one with anti-siphon mechanism. You can install a regular sprinkler valve within the line without raising the level of the valve. The installation process is depicted in the following picture. Again, the PVC pipes will go inside the slip sides of the male adapters and be glued, which is not explained in the image below. We have uploaded a PDF version of the following figure in this link.
How to install a regular sprinkler valve (the great way)
If you use a regular sprinkler valve (without anti-siphon), I recommend that you include a check valve to prevent back-flow even if you have an anti-siphon mechanism already installed in your line. You do not need a check valve if you use the anti-siphon version.
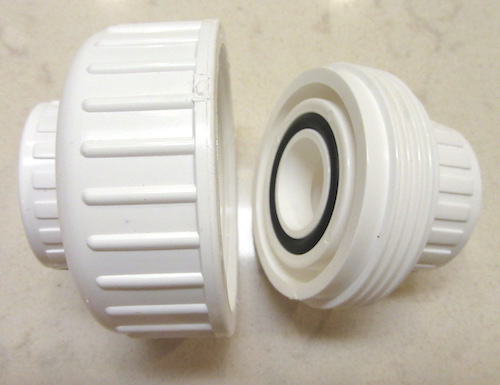
Additionally, we learned the hard way that it is better to make the setup easily changeable. What do I mean by this? If we add two PVC Slip Unions — one before and one after the sprinkler valve, we can replace the valve anytime without cutting the PVC pipes. Unions can be twisted and separated from the line easily. A picture of a PVC union we used is as follows (in its open form).
The following infographic representation shows how we may set up all these items when using a regular sprinkler valve. The picture also provides information regarding gluing and sprinkler wiring. Notice that you can twist the two PVC unions to detach the sprinkler valve and install a new one without any necessity to cut the PVC pipes. A PDF version of the following figure is available in this link.
There is a special wire available for sprinkler system wiring. You will find those wires in the plumbing section (not in the gardening section) of Lowe’s or Home Depot. Or, you may purchase from Amazon.
Concluding remarks
Notice that you can now easily replace the sprinkler valve if it malfunctions. Sprinkler valve installation will cost you no more than $20. Why should we miss all the fun, while we can do it ourselves this easily?
From a Family Blog: Settle in El Paso
Other posts on gardening
Subscribe to receive notifications on our new posts.



Fantastic! This is very useful and helpful to us. At glance its kinda hard to understand but if you focus yourself on it, its easy to assemble the parts. Detailed steps and you enumerate the functions of each area’s, good work!
Inspiring! Wow it’s amazing it was delivered in complete package. Now I have better understanding how to do it, how does it work and probably be impressed by Mom if I do it in her garden maybe some kind of extra income as well. Thank you for sharing that brilliant idea.
Wow! These tips and options tou gave is very informative. Thanks for the easy steps on hiw to do it and may you have more followers because you spent your time to post such relevant topics. Thanks mate!
Thank you for your kind words. I am glad to know that you found this post informative. Have a great week.
I never thought that i’ll need this one. Its very useful and very timely for me hahaha. Glad that i checked your post and read this. Continue the great work and post more helpful informative stuff. thank you
Glad to hear that it will be informative for you. Thank you for visiting and commenting.
I have a vegetable patch in the backyard, I grow vegetables all through the year. I grow seasonal and perennial vegetables. I water my plants manually, I plug in water pipe on the tap, turn on the tap and then water my plants. I did not know I can automate the process by using sprinkler valve. I read the article, however, I don’t think I understood this thoroughly. I will have to read this again.
Because we do not have a large lawn, I don’t think i will. I would like to have it my front yard it would be nice to see it, it is like a fountain in my yard. So, who doesn’t want a sprinkler in the yard?. It ‘s fun and handy!.
This is educational, the way you show us how to do it and with an image, it is easier to understand and to follow.
Glad to know that you enjoyed the post. Thank you for the kid words.
Nice presentation and instructions on your post. I don’t know how to install it until your post. I really learned a lot. Thank you and have a nice day. 🙂
A detailed informative post providing me with a ton of information. The pictorial representation is quite helpful. Thanks for describing the procedure in a lucid language.
A great post that I’m sure a lot of people will benefit from. We don’t really have a large enough lawn for us to benefit from this, to be honest with you. But I’m sure others will be happy that you have written a guide for them to do it easily. If I did want it, I would probably hire someone to do it, I’m really not that good with DIY stuff lol.
Thanks a lot! I’ll definitely adapt something like this to my lawn, the summer here is intense. Can one person alone set all this up? Thanks!
Yes. One person can set it up alone. I did it myself. I did not have any experience doing this before. Thank you for visiting and commenting. Have a wonderful weekend.
Thank you for this, well repairing stuff isn’t my forte but I will definitely try this one, and because it’s very detailed I can just follow your instructions easily!
I am glad to know that you liked it. I did this myself for the first time. I was impressed by myself. 🙂
Thank you for visiting and commenting.
Great informative post. This will help to save some money for sure.
Chris recently posted…Top 5 boot dryers for 2017
Glad to know that you liked this post. Thank you for visiting and commenting.
Your post is very useful, I really may use this in the future because I must make some repair. Thanks for sharing, your post will help me to save some money and I will not pay a plumber!
Glad to hear that you liked this post. Yes, this is quite inexpensive. Thank you.
This is a really informative post and I learned a lot from it. I don’t know when I will have the opportunity to use this new knowledge since I moved to an apartment a few months ago but you know, It’s always good to learn new things.
Thank you for the kind words.
Awesome article thanks. I’m in the process of buying a home soon and will definitely use this info. Thanks again.
Congratulations on the home buying. We will write more posts on irrigation for backyard gardening. We are hoping that all those posts together will give the whole picture. Thank you for visiting and writing the kind words. Have a wonderful weekend.
Well, I am not ashamed to admit that I had no idea what the term ”sprinkler valve” means so thank you for explaining it. I felt like I am reading one of the best and informative installation guides, haha 🙂 We are still using the manual sprinkler but the automatic sounds much more convenient to use.
How hard would it be to set this up myself? I don’t really have too much experience with DIY but your posts inspire me to at least try… so I might print this blog post out and follow your steps. First, I have to find a shop that sells the parts though because Amazon.com’s shipping to my country is bigger than the actual products price.
If you already have pipes in the ground, then the installations of the Sprinkler valve, the automatic timer, and the sprinkler heads are not difficult at all.
I made a trench more than one hundred feet long eight inches deep using a shovel and forced-water — this part was difficult. The trench was to put the pipes. I could rent a trencher but I wanted to do it myself. After trenching, installation of pipes, sprinkler valve, sprinkler heads, drips, everything was easy. We will write more on this.
We were not familiar with anything regarding irrigation three months ago, which inspired me to write on this topic in details. 🙂 Thank you so much for visiting and commenting. Have a wonderful weekend.
Yeah, I saw your digging trench post as well. It seemed like some heavy work! Definitely better for my husband. But yes, we already have the pipes in the ground so I guess half of the work is potentially already done. All that we need is to make the final move of switching over to the automatic valve.
I have done some research and found a couple of shops around me that sell all of the things you’ve listed. All the parts are very affordable so I will definitely go and buy them and give this a shot 🙂 keep your fingers crossed that it works or my husband might mock, haha!
Glad to hear that you are going to try this. Thanks for visiting and commenting. Have a wonderful weekend.
Wow this is some amazing content because before this I had no real thoughts of even wondering how sprinkler valves worked! I’m a stay-at-home dad which means not only taking care of kids as well as cleaning the house, but knowing how to do vital repairs has become a vital necessity on the things I need to do.
Thanks for the information that you provided, now I know a little bit more about how to install, what types of sprinkler valves there are, and why once you consider installing one. Thanks again and can’t wait to read more of your material!
I am glad to know that you found the post informative. We are planning on writing all our irrigation/sprinkler related adventures in details in next few months. Thank you so much for visiting and commenting.
I am not sure if I will ever have need for this one (I have no lawn to take care of, at least right now) but if I do then I will most certainly be back here. The guide is very intricate that you’ve given us here! Retweeted and will share to Pinterest too.
Haha ? glad to know that you will be back here if you need sprinklers. I appreciate the visit, comment, and the share.
As a single mom I am always trying to do things around the house myself instead of hiring someone to do it. I think installing some sprinklers in our garden would be a great time saver for us. I did not realize that they were so inexpensive or I would have done it a long time ago!
I am happy to know that you found the post informative. Yes, these are very inexpensive. Even the other items that are not explained here in this post are inexpensive as well. For example, 100 feet long poly-pipe is around 40 dollars or so. A sprinkler-head can be as inexpensive as 3 or 4 dollars. Overall, irrigation materials are not that expensive.
Thank you so much for visiting and commenting. Have a wonderful weekend.
Very detailed! This information is coming in the nick of time for us. We are using our sprinkler often–it’s not raining here in Washington, which makes for nice weather, but the soil is very dry.
I am glad to know that the post will be useful. We will publish a few more posts on irrigation. Thank you for visiting and commenting. Have a wonderful weekend ahead.