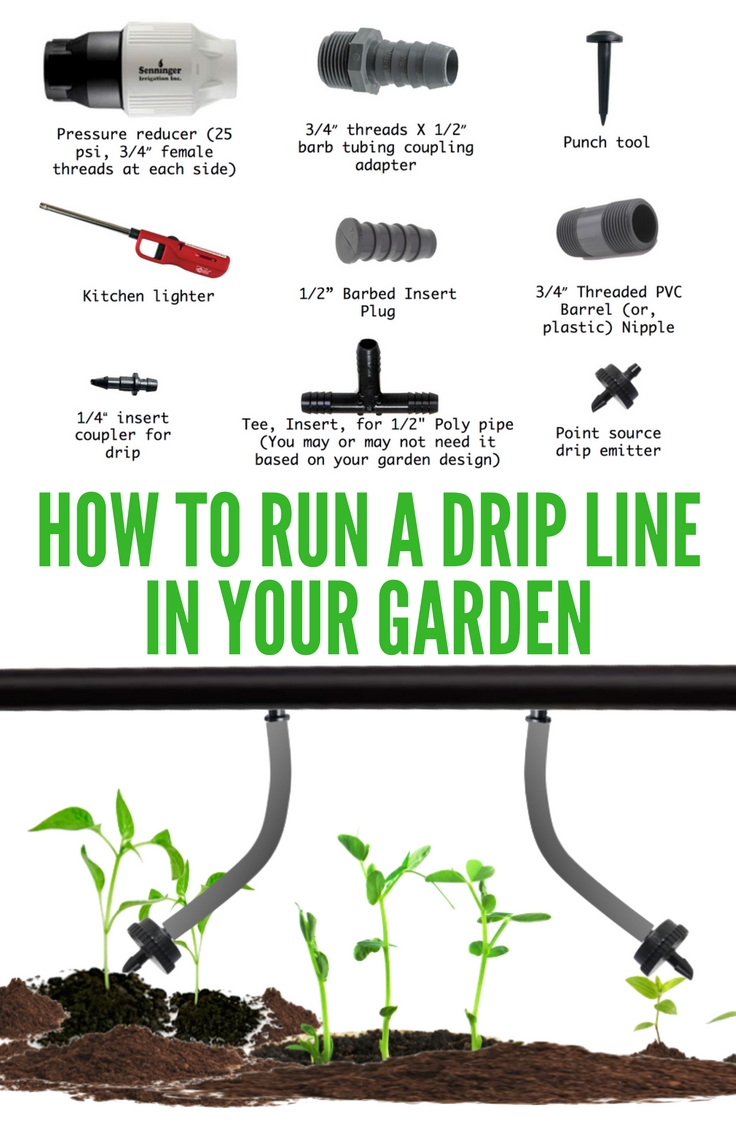
In some previous posts, we have demonstrated how to install a sprinkler valve on a 3/4″ PVC line and how to connect a PVC to a Poly pipe. Today we are outlining how we may run a drip line for trees from the poly pipe.
This post contains Amazon affiliate links, the meaning of which is that if anyone purchases anything using the Amazon links in this post, we will receive a commission with no additional cost from the buyer’s side.
What is a drip line irrigation system?
I am sure you have seen drip irrigation lines many times before. Have you noticed those skinny pipes under the shrubs? Or, water dripping from the head of a pipe, as shown in the image above? Yes, those are parts of a drip irrigation system.
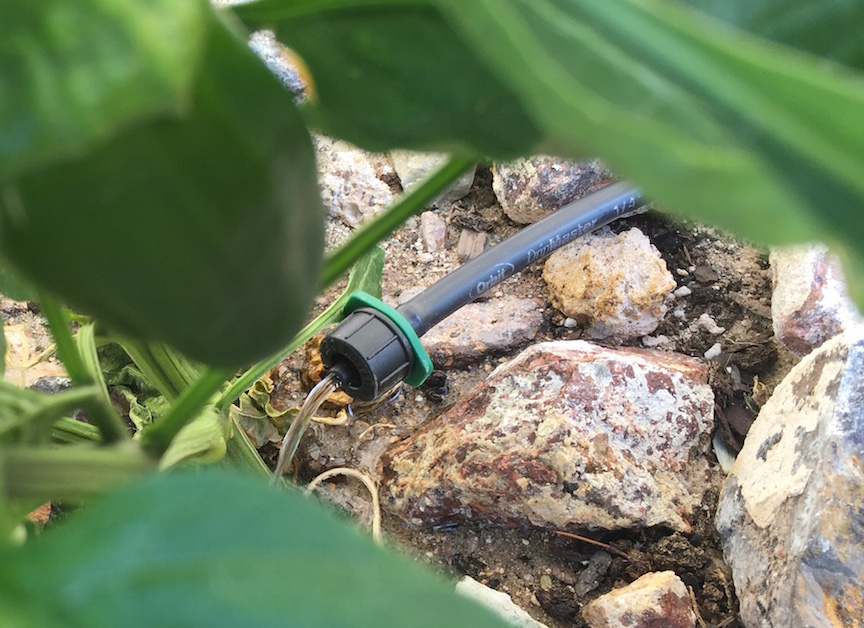
The idea of a drip irrigation system is …. well as the phrase “drip irrigation” implies — a system that will help water drip slowly instead or releasing too much water quickly.
Why is drip irrigation important for plants?
For shrubs and plants, dripped water for a longer period is more effective than pouring the same amount of water quickly. Why? The reason is, plants do not have tummies. The water humans consume, quick or slow, immediately goes to the tummy. Plants cannot drink as quickly as humans. They need hours to drink water. The longer we take to water our plants the more they can absorb it. When released quickly, the water will dry up even before the plant gets a chance to absorb it.
I have a main irrigation line. Can I build a dripline irrigation system?
Good question. Yes, definitely you can.
If you have the main irrigation line made of poly pipes and that line is not used up by sprinklers, you can definitely convert the main line to a 1/2″ poly pipeline from which you can run your 1/4″ drip lines (we will describe the details soon).
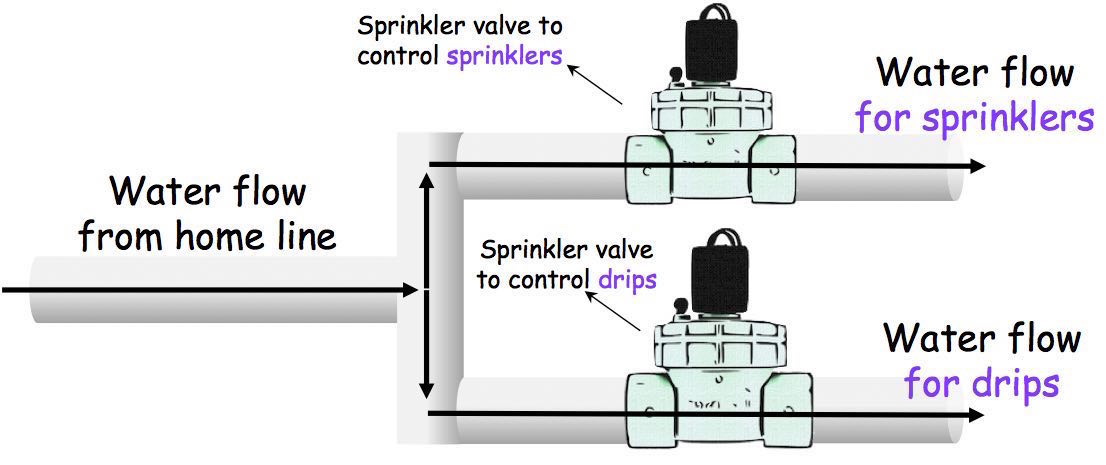
If your main irrigation line is already used by sprinklers, you will need a separate mainline, preferably controlled by another sprinkler valve, to run the dripping system. Please take a look at the following figure.
Two separate sprinkler-valves are used for two lines in the figure, one for sprinklers in the garden and the other for drips. Today, we are discussing how to run the drip irrigation lines.
What do I need to run a dripline irrigation system?
Great question!
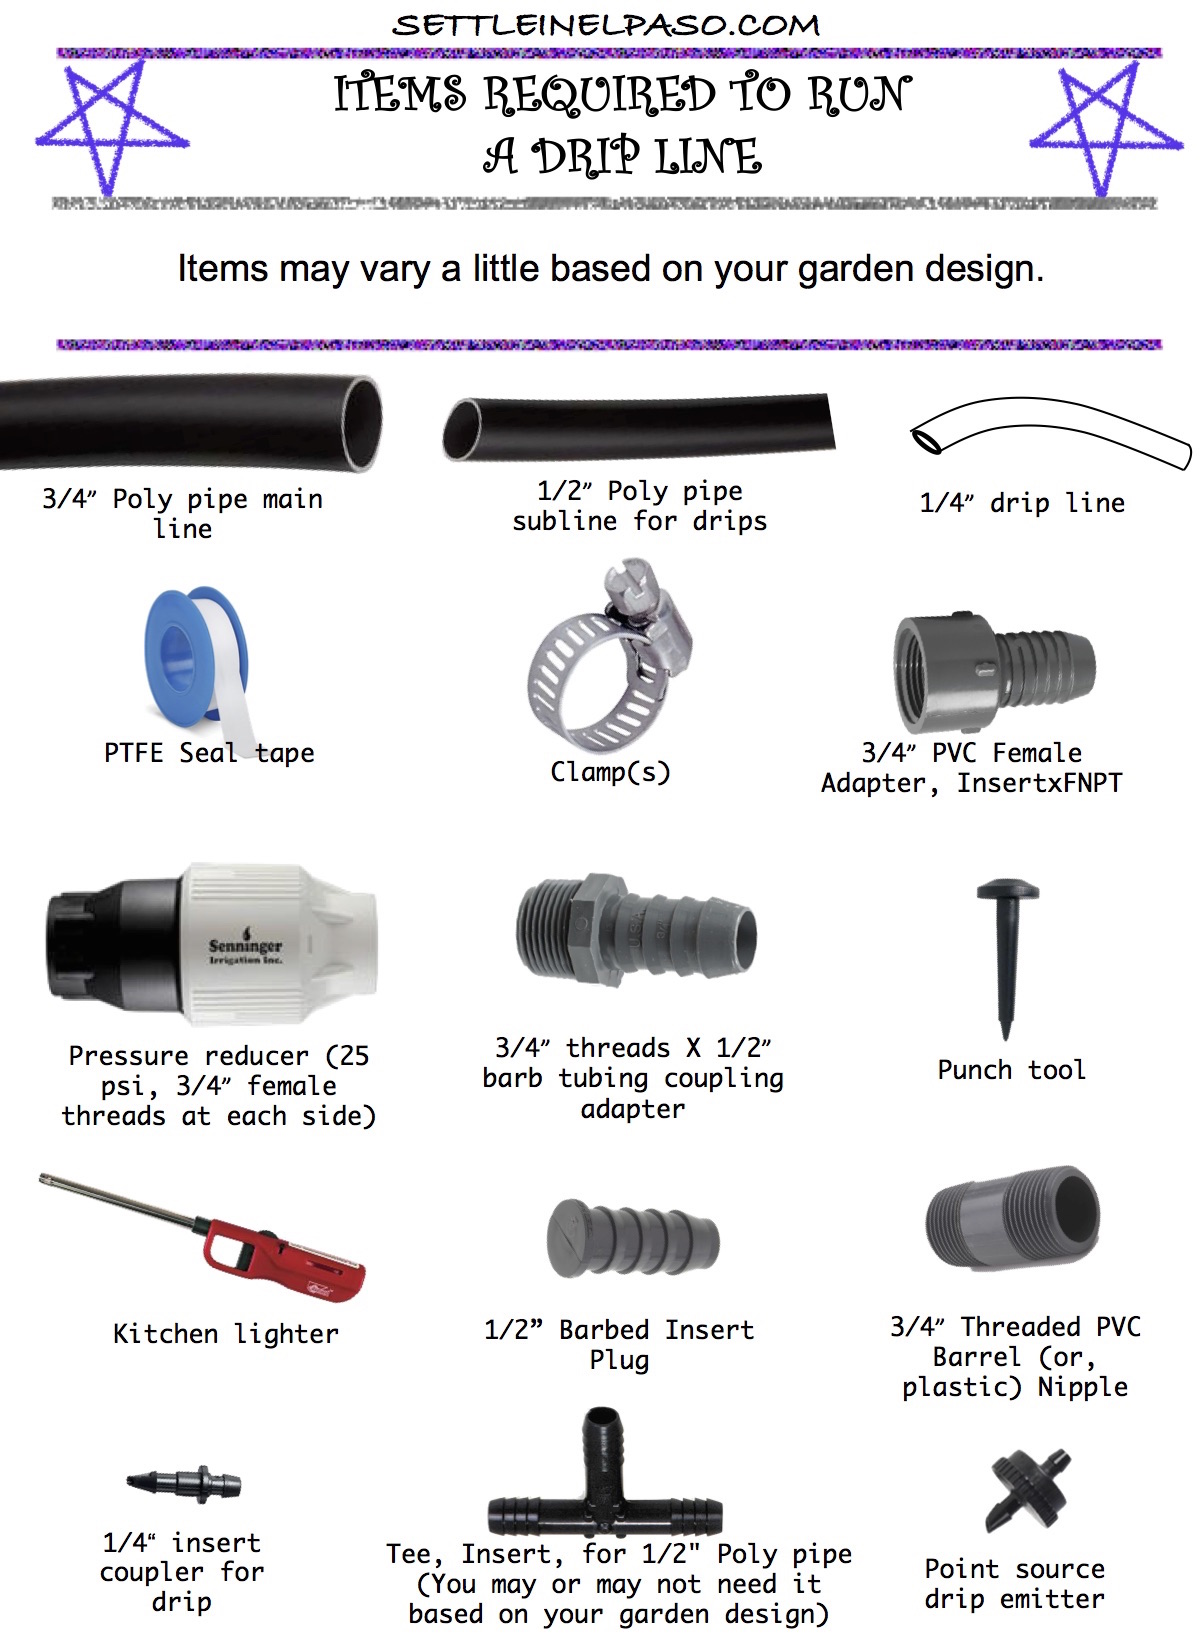
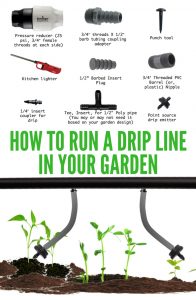
Assuming that you already have a dedicated line that can be used by the drip system, the items you need are as follows.
As a note, the items may vary based on your garden orientation. For example, I needed a Tee-connector because I needed to spread the drip line in two opposite directions. You may not need it.
Why do I need a pressure reducer?
The home line generally has 70 to 100 psi pressure, which is good for sprinklers but not recommended for drips. The preferred water-pressure for a garden drip system is 25 psi.
More pressure damages the drip emitters in the long run. Moreover, the idea of a drip system is to use slow irrigation, not a fast one. This is why we need a pressure reducer.
I purchased a pressure reducer from Lowe’s. I am sure it is available at Home Depot too. An Amazon link for a pressure reducer is here: Pressure Regulator, 3/4-Inch Female Pipe Thread.
What type of clamps do I need?
We need clamps to seal poly pipe joints or when we connect poly pipes with any barbed fitting. There are several types of clamps. The most common one (not shown in the picture) needs a clamp tool to tighten it. I prefer the screw-clamps, commonly known as Stainless Steel Hose Clamps. A sample screw clamp is shown in the picture above.
The benefits of a clamp with a screw are three-fold: (1) you don’t need the clamp tool, (2) it is easy to use a screwdriver to tighten and loosen the clamp, and (3) clamps with screws are reusable. A drawback is that screw-clamps are a bit more expensive than the regular ones. I felt that the extra expense is worth the convenience.
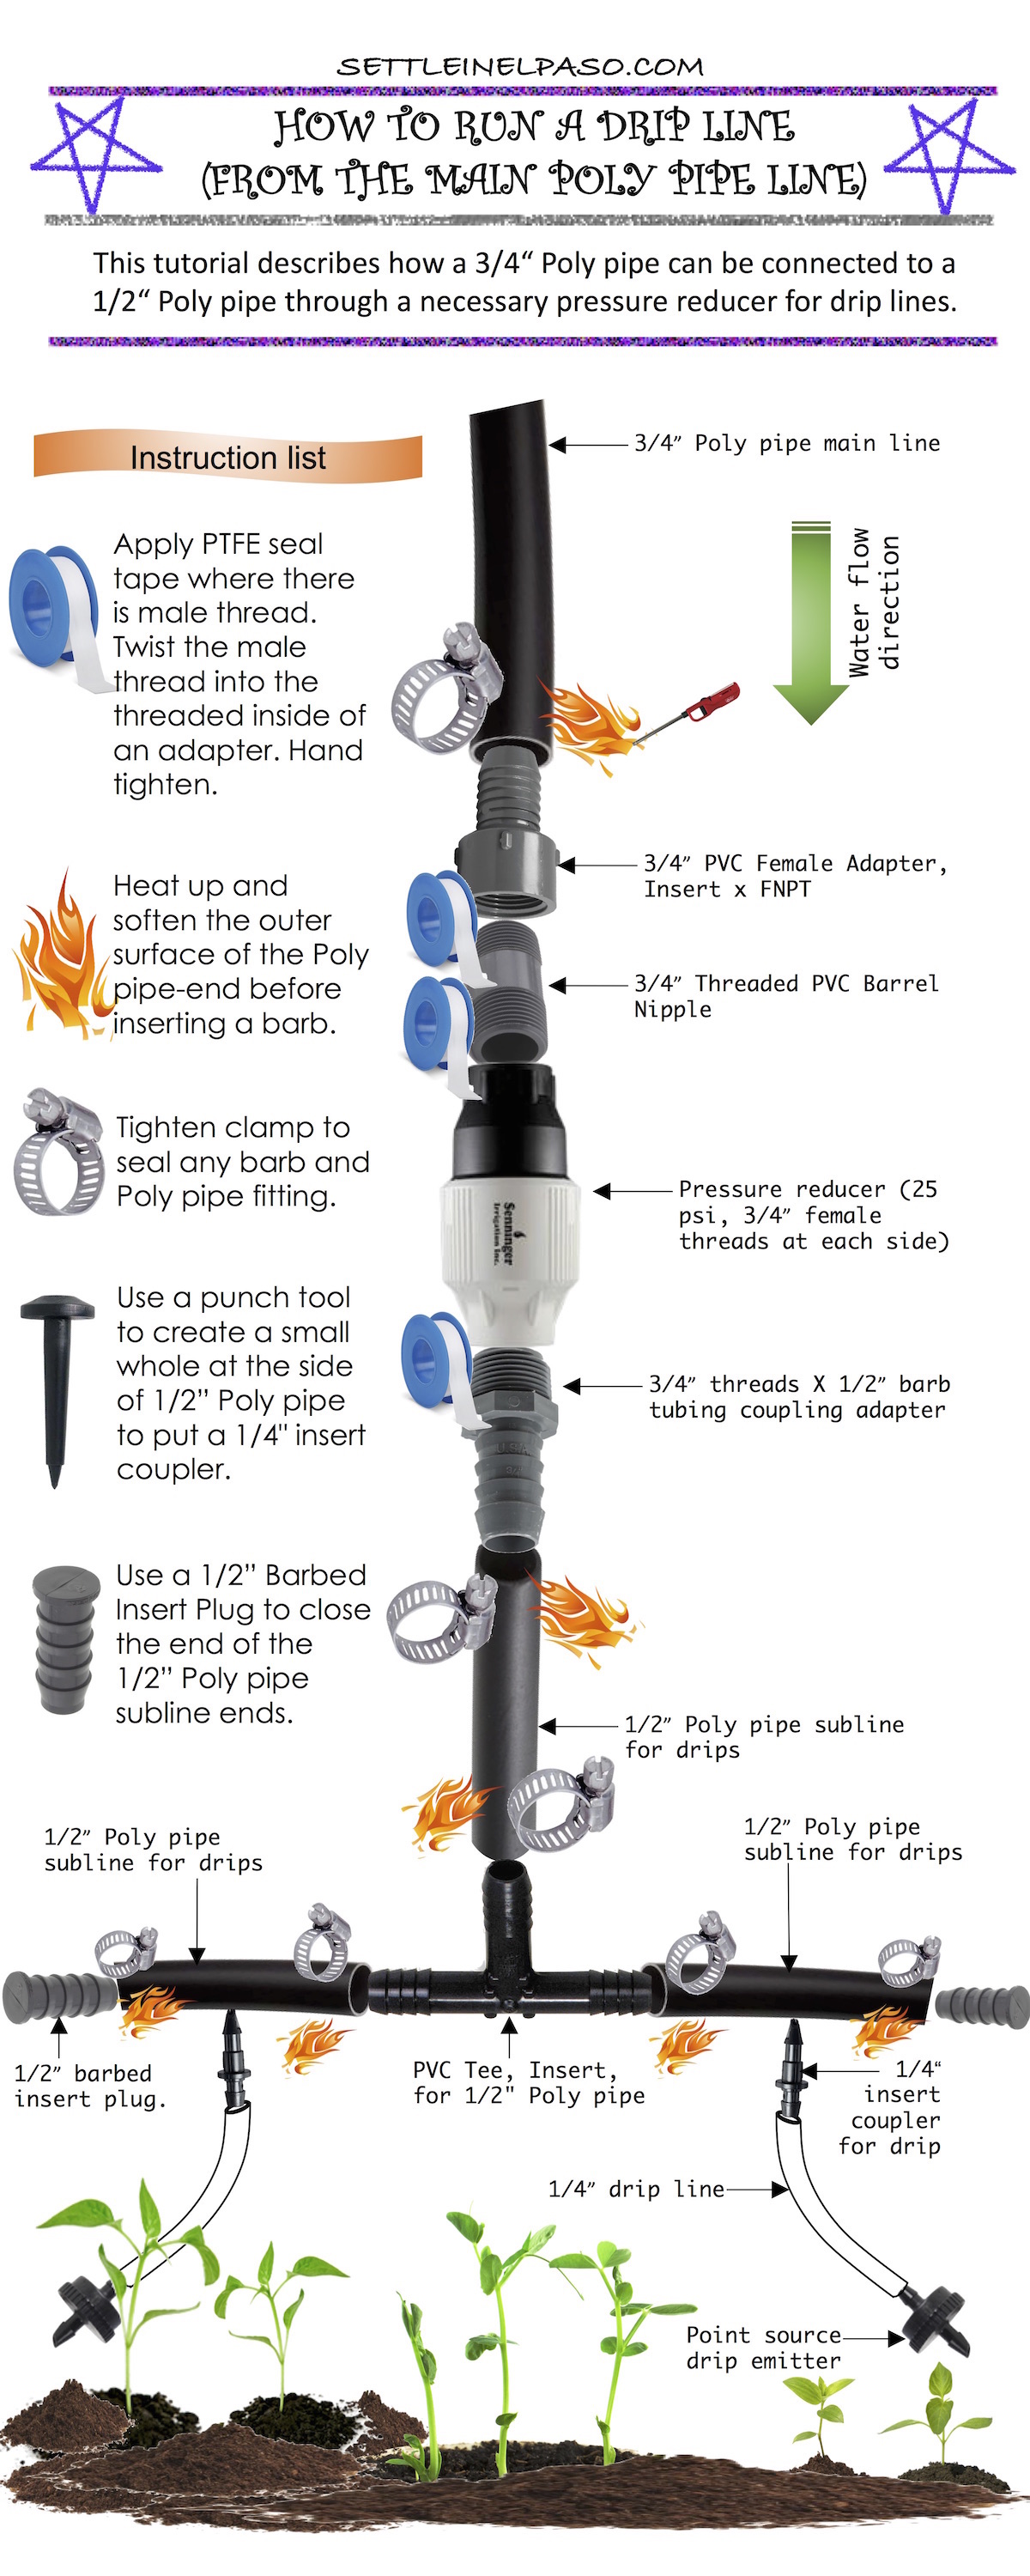
As illustrated in the following figure, the clamps seal the connections between barbed fittings with the poly pipes.
You may need to heat up the poly pipe-end with a lighter to insert a barbed fitting into the poly pipe. After inserting the fitting, place the clamp around the end-edge of the poly pipe and screw-tighten the clamp. This will seal the joint.
Please make sure to buy clamps that will even fit a little larger pipes than the pipe you have. If I have a pipe of 1/2″ diameter, I would purchase a clamp that fits pipes in the range of 1/2″ to 3/4″ or bigger. This is because sometimes it is hard to fit a clamp ranging from 1/4″ to 1/2″ to a pipe of 1/2″ diameter.
Are there varieties of drip emitters?
There are too many varieties. We started with a simple one — a point source drip emitter.
Some emitters will release one gallon of water in an hour, some may release two gallons per hour.
You will need to choose the right emitters based on how long you want to run the drip system using your irrigation controller and how much water the plants need.
What is a punch tool?
A punch tool is used to create a hole on the 1/2″ poly pipe so that you can run a 1/4″ drip line from it. After punching the hole, one end of a 1/4″ insert-coupler will go inside the hole and the other end of the coupler will go inside one end of a 1/4″ drip line.
How can I really install this dripping system?
Now that you have an idea about the items needed, you can easily set up a drip irrigation system based on the layout of your garden. The backbone of the drip system is generally a 1/2″ poly pipe because it is easier to handle 1/2″ poly pipes than 3/4″ or larger lines.
We can easily create holes on 1/2″ poly pipes to run the 1/4″ drip lines. We installed a dripping system that has the following setting. The instructions are provided with the picture.
A PDF version can be downloaded from this link for printing.
Irrigation DIY is of great fun and something that can be enjoyed with the whole family. To our experience, the hardest parts are knowing the right tools and planning. The “doing” part is not that difficult. If we can do it, I am confident to say, anyone can do it. 🙂
Concluding remarks
We are a bit late in posting our drip line irrigation DIY. Who will do this DIY in Fall — unless someone is living in the Chihuahuan desert? That is not the point. The information will remain here for the coming Spring. So many more tales to tell in the meantime …
Other posts on gardening
Subscribe to receive notifications on our new posts.




I had little bit idea about dripping and irrigation but I wasn’t sure how to apply it in my garden, but after reading this article I have got all the information about dripping and irrigation system.
Thank for sharing this blog with us.
I so appreciate your note. I am glad to know that you found the post informative.
Would a setup like this cause any damage to the property? Our townhouse has a sizeable back yard and I would love to start gardening, but we’re renting the property. We are allowed to plant in the backyard, but would I have to worry about something like this causing any damage?
This is lovely, thank you for sharing this. I and the boyfriend daydream a lot about having our own bit of land to grow produce and fruit trees, this seems like an excellent idea.
How’s water consumption though? The amount of water that we have available isn’t what concerns me, sustainability is. We’re huge fans of being as environmentally friendly as we can, does a system like this waste a lot of water?
I’m really forgetful so this would be great, our poor little plants wouldn’t die due to me being such an airhead.
Drips are great for watering plants slowly. You can use a sprinkler controller to maintain for how long water will flow. Then the point source drip emitter has different types like, one may release one gallon of water in an hour, another may allow two gallons per hour, so and so forth. Therefore, there are flexible options when you use drip irrigation.
Thank you for visiting and commenting.
I started my own Drip irrigation system for my Kitchen garden. I have been having challenges particularly with the drip holes blocking…Any idea on how to unblock these tiny holes? And how can I prevent the blockages? ….Otherwise After reading your article am now more knowledgeable on Drip irrigation.
Thank you very much.
Generally, drip irrigation lines work well with 25 psi (pounds per square inch) pressure. There will be no blocking if you have that pressure, I believe. Also the right point source drip emitter may prevent blocking.
Thank you for reading the article and commenting.
My dad would not have the patience to explain this to me. Great find for me!
It’s impressive. I got all the idea on how to do it. I love outdoor activities and one of them is gardening. Any idea for hanging plants as well? Upon installing this drip I dont have to pull the water hose and return it back after using. It’s a time saver and convenient. Brilliant idea. Thanks
Glad to know that you liked the post. Have a great weekend ahead.
We had a small garden outside our house and I use to water them every morning and evening. The way I spray those plants is very inconvenient for me because I need to connect the hose to the faucet approximately 30 meters away from the garden. I think its practical to use another method for sprinkling them everyday and that is your way. Slight complicated with the materials and procedures but definitely with the help of this diagram and instructions, I can easily follow the process. Very useful topic.
Glad to know that the post will be helpful. Thank you for your kind words. Have a wonderful time.
I had some few basic knowledge about drip irrigation whichi had almost forgotten mainly because I don’t have a garden. Your post just refreshed my memory and am thinking this is way more than I knew. I only wish I could put it to use.
This may come in handy in future. So blog posts like these help a lot. I also learnt about this irrigation method long time ago in school.
Your explanation of the drip system is well detailed. I feel as if I’m back to school. Though I already have a line irrigation line, itis good to know I can easily build a drip irrigation system. My plants sure need all the water they can get. This post is helpful, thanks.
I am happy to know that you liked the post. Thank you for visiting and commenting. Have a wonderful week.
I am a farmer, I grow vegetables. Sadly, water is very scarce here, especially during the winter and summer. I have been thinking about installing drip irrigation for a long time, however, I have been dilly-dallying. THis is a good tutorial, after reading this I think I can install drip irrigation myself. Thanks
I am so happy to know that you think this post is informative. Thank you so much for visiting and commenting. Have a wonderful weekend ahead.
Sorry about the water issues. Am facing the same challenges with water shortage too. Too bad I might not get to put this good piece of information to use.
As a farmer, what other irrigation methods do you use? This is a good irrigation method, in addition to the other popular methods used by farmers.
Thank you for the complete detail of information. This really helps a lot. What I’ll do is I’ll put sprinkler and buried the tube underground just to be safe. Nice post. 🙂
Yes, that is good information, The pipes should be placed all underground.
I am happy to know that you liked this post. Thank you for visiting and commenting.
Wow, you are really good in this, I have an irrigation line it is made from a long hose with a lot of small holes. I had to pay someone to make this line of irrigation and it was not cheap, in fact, I think I will recover the money in a couple of years!
Yes, it is totally worth it — paying for it or DIY — whatever the method is. Thank you for visiting and commenting.
Nice! Very informative procedure on how to make drip irrigation. This will help me in my future. I will save it and do it in my garden. Keep on posting informative articles and blogs.
Glad to know that you lied this post. Have a wonderful weekend.
Thank you. I need to show this to my husband. We need a project for the spring.
I am glad to hear that you liked the post. Hopefully, we will be able to write more on irrigation before Spring.
Thank you for visiting and commenting.
Your info will help many people with this DIY project come next spring 🙂 I’m thankful for all of the pretty flowers that will result from the drip-line system! Sharing on Twitter and StumbleUpon now.
I appreciate your comment. I too wish that the post will help grow the pretty flowers late spring and early summer next year. Thanks a ton for the shares. Have a wonderful rest of the day.
I have learned Drip irrrigation for some time already and never thought I’d be able to encounter it again. With a very comprehensive discussion I might consider one. I am using the old school watering of my garden I find drip irrigation very convenient and also conserves water. I guess this would be very efficient if your always on the go or traveling for a period of time. So that is why I believe in the second time around. It may not be interesting for me at first but is now useful to me the second time around.
I am glad to know that you are familiar with drip irrigation. Definitely, it is a life-saver (figuratively for the plants) when we travel.
Thank you for stopping by and commenting.
That’s an amazing presentation of drip irrigation. I learnt this topic many years ago and almost forgot everything about it. That’s partly because I don’t live in an arid area like El Paso. Still, this is one of the best irrigation methods because it doesn’t cause a lot of soil erosion.
Glad to know that you liked the presentation. Thank you for visiting and commenting. Have a wonderful day.
I enjoyed reading the post on how to run a dripping system down to the garden. I’ve not got a garden yet, but I can confidently say that with reading this article that I can help anyone around my neighbourhood that wishes to get the drip line done down to his/her garden.
Thank you for taking your time to give comprehensive details of everything. Truly, the garden needs water for the flowers in them to grow. I also think this can work well during the rainy season in my area.
I am happy to know that you liked the post. Thank you for the visit and the comment. Have a wonderful day.
Wow, nice post again sir/maam. You have presented such detailed procedure on how to make an drip irrigation. This will help garden owners who wants an automatic sprinkler or irrigation when they are out of town. Thanks to this genius idea of making drip irrigation. More post to come SettleinElPaso!
Thank you very much for your kind words. Have a wonderful evening.
Thanks also SettleinElPaso team for such wonderful post and topics which will be helpful for a beginning family. Thanks for noticing my comment. I admire your passion in reading each and every comment in this blog.
Haha … I always notice your comments. Sometimes we are a bit late in responding but we adore all the comments we receive in this blog. Thank you so much for all your comments in many of our posts.
It is a bit too late for the drip line from where I’m from because we’ve been having constant rain and around 10°C but it is definitely something to consider for next year since I do have a garden.
I just have to say that you really make amazing DIY posts. I haven’t seen anybody put so much effort in these – the infographics are my favorite part for sure. You truly cover all aspects and already answer any possible questions. You should soon publish an ebook about DIY, haha 😀 I think it would do well.
I am glad that you liked the post. Ebook sounds like a good idea. Probably someday, we will. Thank you. Have a wonderful day.
I loved your post and the thing about publishing an ebook is a great idea. These post are really amazing.
I learnt about drip irrigation for the first time when I was in school. You have provided a detailed explanation about drip irrigation using informative photos. I am quite interested in this topic as it has provided me detailed knowledge of the topic which I had brief knowledge previously. It will be helpful in my day to day life.
Glad to know that the post will be helpful. Thank you. Best regards.
Thank you for your kind reply. I love your informative posts with detailed explanations, photos and diagrams and videos. Here in India many people have adopted the drip irrigation system mainly in the desert areas.
Drip irrigation will also conserve water. It is indeed a perfect idea to have it when you travel a lot. So, you won’t worry that your plants might die of thirst. I wonder what’s the weather look like there in your place? must be so hot. it’s a desert but you have Fall season? Sound strange interesting place. Anyhow, I like your idea of drip irrigation and how you teach us how to install it also. You must do mulching as well so it will have moisture.
Have a good day!
Yes, it is quite hot here in El Paso, Texas, still now. Today it was close to 90 degree Fahrenheit in the afternoon. We have Fall but a short one.
Mulching is a great idea. Definitely, something I plan to do to save water. It is taking a long time since we are doing everything from scratch.
Thank you for visiting and commenting. Have a wonderful rest of the week followed by great weekend.
Wow! well detailed about how to run drip line in your garden. Now I am planning to put a dripping system in my garden for my Bermuda grass. Although I might only need this for the summer season. I think this is more advisable than watering them manually. Afte all it’s easy to install since I have the procedure through this blog.
Thank you for visiting and commenting. Several sprinklers will be better for grass if you have a large lawn. Dripping lines are good for shrubs and plants. We will write a post on installing sprinklers as well.
Have a wonderful rest of the week.
Yes, I also thought that you can’t use this method for lawns. Doing that probably needs a sophisticated way of arranging the pipes to ensure the water reaches every part of the lawn. That’s a bit expensive than using a sprinkler. I haven’t seen anything of that kind.
Nice detail. With water at a premium though maybe consider cacti ?. Spoken like a true Great Lakes dweller I suppose, where water is abundant.
Haha ? cactus sounds like a good choice. City of El Paso has somehow managed its abundant supply of water ? despite being in the desert. Probably, a blessing of Rio Grande. Thank you for visiting and commenting. Have a wonderful evening.