


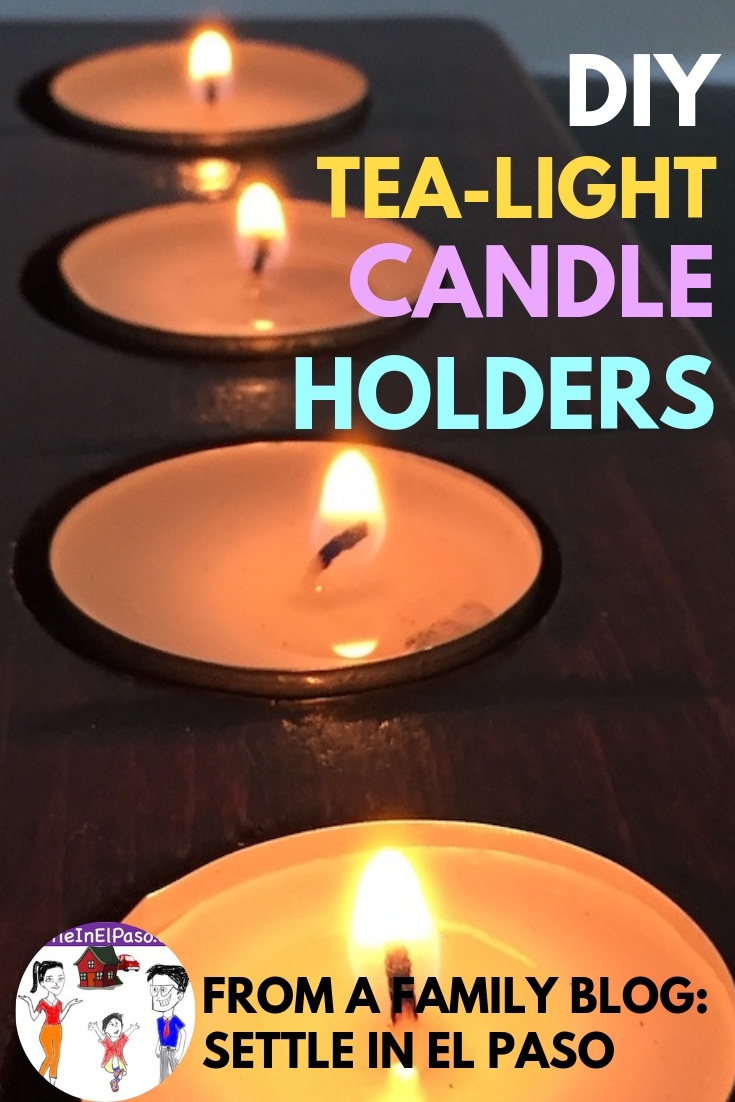
Our resident Handyman (Dear Dad of this blog) has become very interested in woodworking projects. He loves the smell of wood. All sorts of softwood-hardwood thingy are his center of attention during the weekends nowadays. This is a good time to get things done around the house. Some examples of getting things done would be — making some candle holders, a few wall-mounted coat racks, several floating shelves, a side table, some trays, or let’s say — a couple of stools.
As much as making things is rewarding the frustration is quite strong too with a failed project. Our Handyman has already learned that a failed DIY project is a great learning experience that will lead to success in the next project. The wooden candle holder DIY project described in this article is one that is in the successful side of our Handyman’s efforts, after a few not-so-satisfactory candle-holder projects.
Let us come to the point. How do we really make a rustic wooden candle holder? The following Youtube video provides a quick glance at how to make it. Further details are provided in the rest of this article.
Items required for a DIY tea-light candle holder
The items for a wooden candle holder DIY project are easily available, mostly at Home Depot. Some Amazon affiliate links are provided in this article to help readers recognize what items I am referring to. We will receive an incentive from Amazon if you use any of the links to purchase anything, with no extra cost at your end.
Weathered wood board: We used a Weaber Weathered Hardwood Board with written dimensions 1/2 in. x 4 in. x 4 ft (Actual dimensions 3/8 in. thickness x 3-7/8 in. width x 4 ft) for this project. The basic idea was to use a board that had a similar thickness as tea-light candles. That is, the candle holder we are making is for tea-light candles, not for regular long candles. A weathered hardwood board gives a nice rustic look to the project.
Wood glue: We used Gorilla Wood Glue for this project. It is a water-based adhesive that can create a strong bond between two wood-pieces. If you are not familiar with gluing wood pieces before, you will be surprised to find what a strong wood-joinary you can make simply by using wood glue.
Oil-based stain: We used a oil-based penetrating stain from MINWAX. You can choose color from a plenty of options. The containers are available in different sizes too. We prefer a small (quart) container over a large one because most of our woodworking projects are small and do not require a lot of wood-surface to be stained.
Polyurethane clear finish: We used a semi-gloss polyurethane clear finish as a protective coat. It is oil-based product. In addition to protection, a polyurethane coat gives a professional sheen to the wood project.
Tools required to make the wooden candle holder
The list above provides the items that are required for the project itself. You will need some tools to cut, stain, and finish the project. We used the following tools.
- Drill driver: A good drill driver is required for this project to make holes. A hole saw is attached to the drill driver to make the holes.
- Hole saw: We used a Daredevil 1-1/2 inch Wood Hole Saw with Arbor. We could not find it on Amazon. A link of the product at Home Depot is provided here. One end of the hole saw goes to a regular drill driver. Then the driver can be used to make the circular cut.
- Hand saw: For small projects, Handyman uses a handsaw instead of an electric circular saw to cut wood pieces. For this project, he used the handsaw to cut two pices of wood from the four-feet long board.
- Random orbit sander: Our handyman uses a random orbit sander for all woodworking projects that have any visible surface. In one of our previous articles, we provided some details on how to sand wood.
- Sandpaper for handsanding: We used regular 220 grit sandpaper to sand the edges of the holes. We used 320 grit sandpapers between applications of polyurethane.
- Screw driver: We used a regular screwdriver to remove the wood-plug from the hole-saw after making each circular hole.
- Paintbrush:We used paitbrushes for staining and applying Polyurethane on the wood project.
- Scale:We used a regular 1-ft scale for measurments.
- Pencil:We used a pencil to draw lines and circles, and mark the centers.
- Compass:We used a compass to draw circles before making the holes. Drawing the circles helped in making sure that two consecutive circles have enough gap between them.
- Clamps:Some small clamps are required to hold two wood pieces. At least two bar clamps are required to hold the wood board with the workbench when drilling the holes.
The process
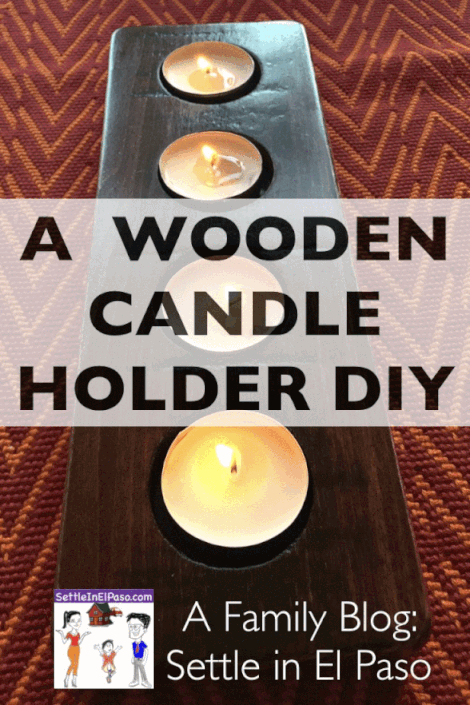
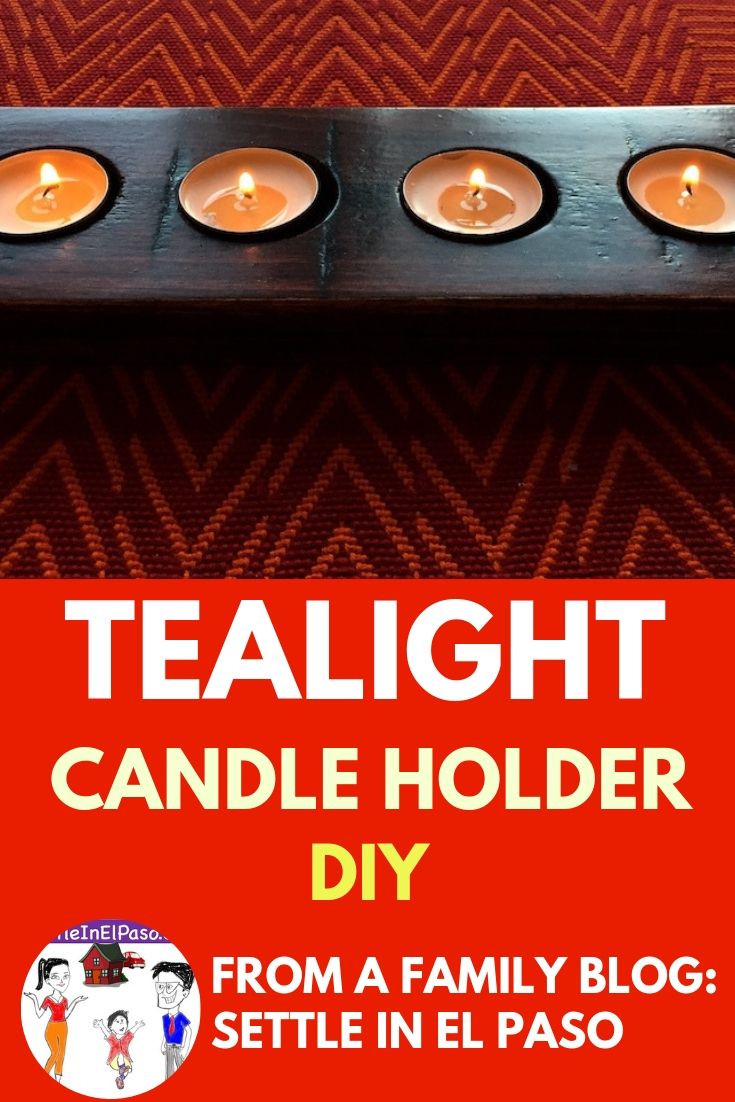
A wooden candle holder is a fabulous home decoration piece. With the right tools, it is not hard for a weekend woodworker to make a beautiful candle holder. Step by step procedure for making the candle holder is provided below.
Cut the wood
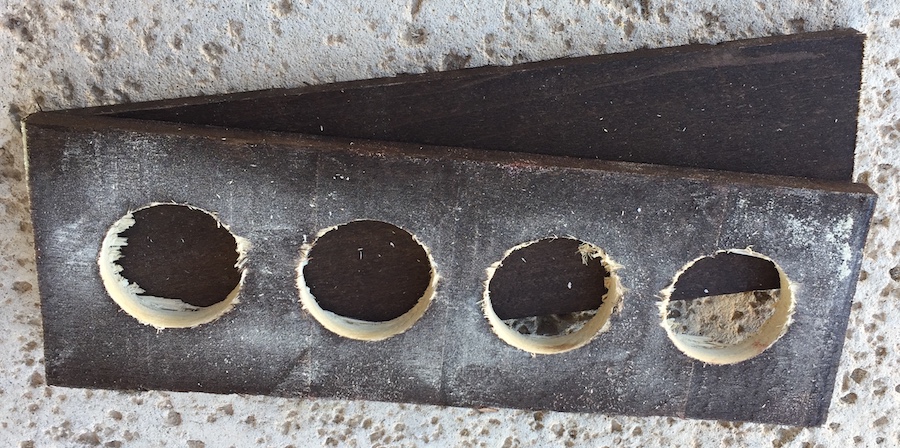
Our handyman used his handsaw to cut two pieces from the four feet long weathered wood board. One piece would contain the holes and the other piece would become the base. Each piece was around 10-inch long. Since the actual thickness of the original board was 3/8 inch, the overall thickness of the candleholder will be 2*3/8 inch, which is 3/4 inch. The width is 3-7/8 inch.
Mark using the scale and pencil
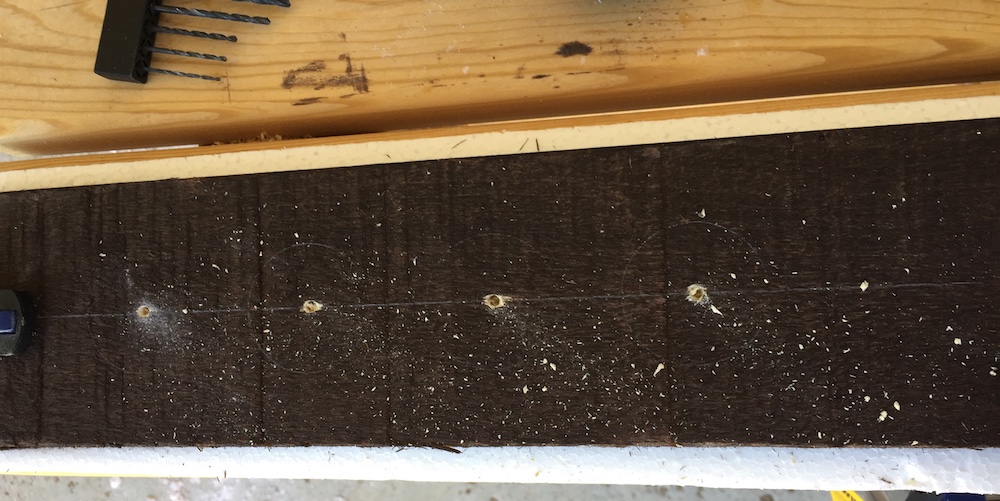
Draw a center line across the length of the piece that will contain the holes. Handyman used a compass to draw circles of 0.75-inch radius (1.5-inch diameter). He drew four circles. The circles will become holes. A standard tea-light candle is generally a few hairlines over 1.25-inch diameter, which would fit well inside a hole of 1.5-inch diameter.
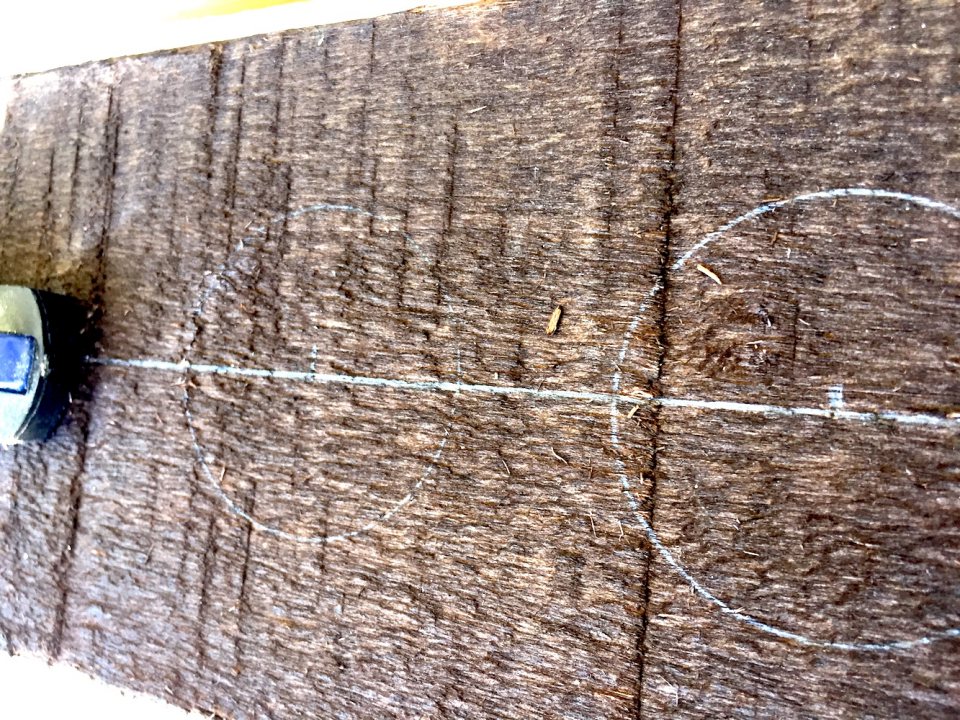
Handyman marked the circle-centers too. He drilled a small screw-head-like hole using a regular drill-bit for each of the circle-centers so that the arbor-tip of the hole saw can be placed there tightly later. Without the small screw-head-like holes to place the arbor-tip, the hole saw struggles to settle in the beginning when you switch on the drill driver.
Drill holes
Make sure to clamp the wood with the workbench, using at least two bar clamps, well before starting to drill. Handyman attached the hole saw to the drill driver. He put the Arbor-tip (the spindle-tip) of the hole saw on the center of a circle (where he drilled a small screw-head-like hole before). He held the drill driver strongly and started to drill. It looked like Handyman was having fun drilling the holes.
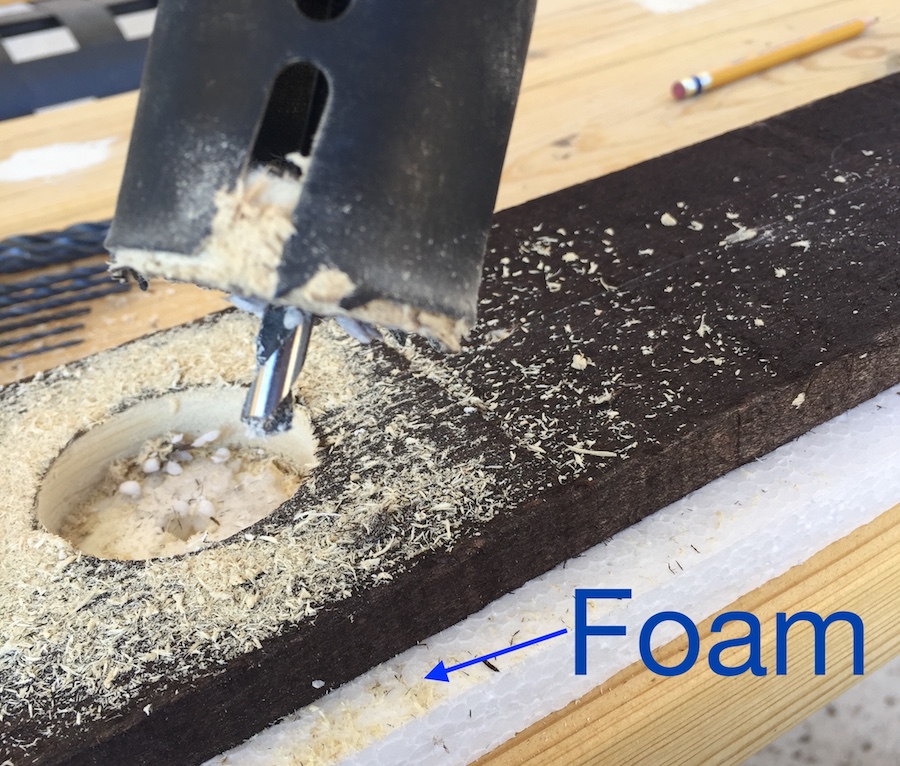
When you use a hole saw put a regular protective foam (styrofoam) underneath the wood piece to protect the workbench from being scratched. That is, you sandwich the foam in between the wood piece and the workbench surface. Then clamp the sandwich.
After making each hole, Handyman removed the wood-plug that was left inside the saw using a screwdriver.
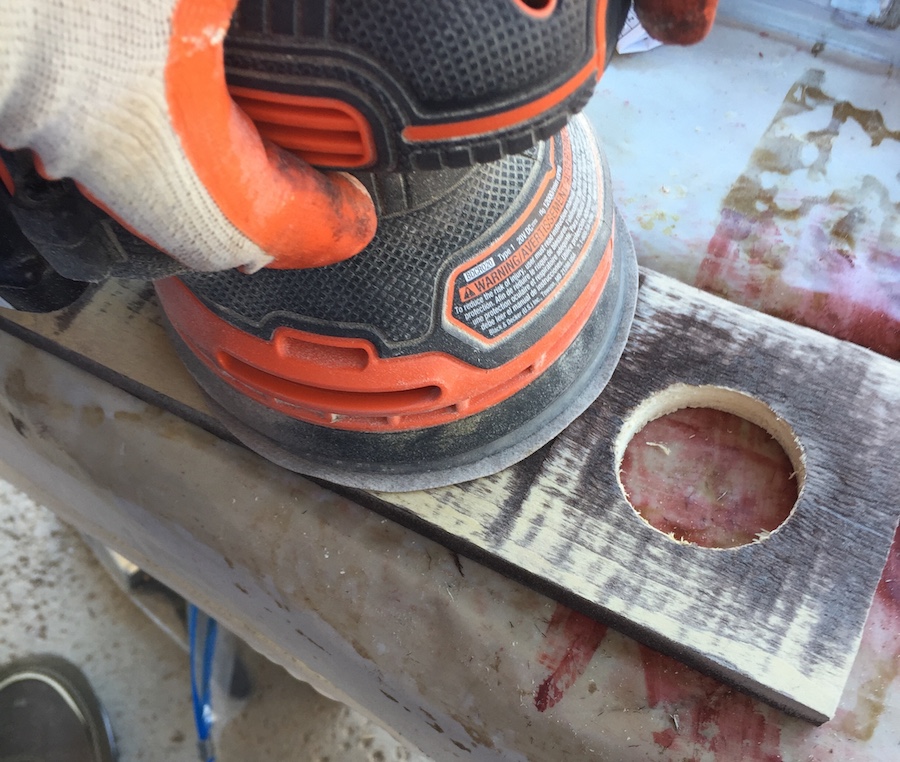
Sand
Sand both the pieces of wood to a point where the pieces still have some rustic look left. The edges of the holes need to be hand-sanded because a random oribit sander cannot reach round edges well. Detailed instructions on sanding are provided in one of our earliar articles.
Glue the two wood pieces and keep them clamped
Use wood glue to join the pieces together. Use as many clamps as you can to hold the two pieces together.

A little bit of glue squeezing out of the sides after clamps are placed is good. It indicates that the sides will not have any visible gaps. Handyman prefers to use his finger to smudge-clean the extra glue that comes out. This fills up any tiny gaps between the boards, at least in the sides.
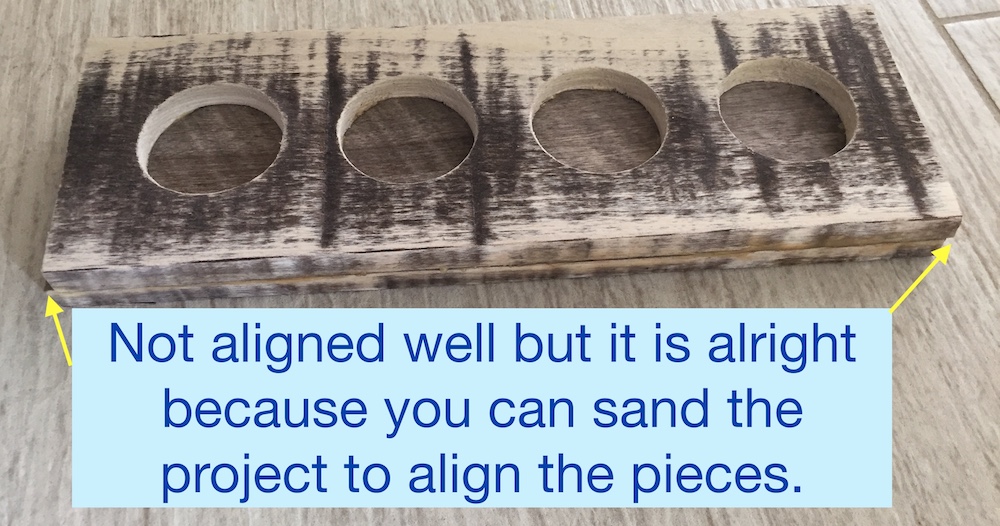
You can remove the clamps after a few hours. Let the project dry for twenty-four hours.
It is alright if the two pieces are not perfectly aligned because the next step will align them.
Sand again
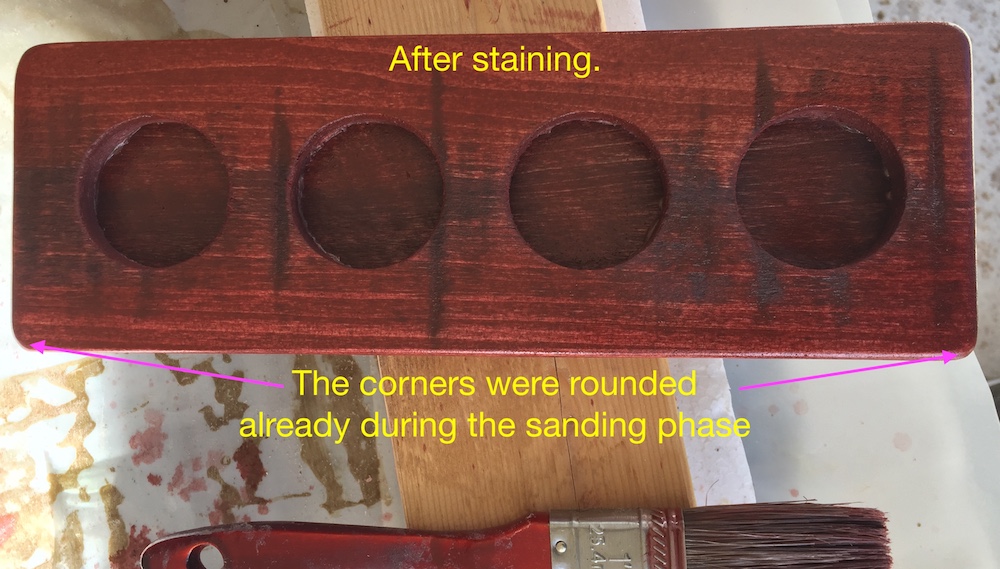
Handyman used the random orbit sander to sand the sides and make the corners and the edges rounded. He sanded the project well enough to make sure that any side with unaligned boards is smoothened flat.
Handyman made sure that the dried wood glue in the sides is sanded away. With dried glue on the wood, the stains cannot penetrate the surface well. As a result, the grains do not match with the area where there is dried glue. The pleasure of looking at the wood grains on a project is deteriorated if the wood surface is stained without removing the dried glue.
Stain
We are fond of dark stains for wood projects. For this particular project, we used a Sedona Red penetrating stain. It gave the project a gorgeous furniture-look.
Handyman used a paintbrush to stain the project. He wiped the project with a clean rag half an hour after applying the stain. Without wiping off any excess, the stain sometimes becomes sticky. We left the project to dry for more than twelve hours after staining.
The wood grains show off themselves after staining. They become more prominent and that is the beauty of staining a wood project.
Apply polyurethane
Staining gives a color to a wood project but it does not create any protective layer. We applied a semi-gloss polyurethane as a protective layer.
We used a paintbrush to apply polyurethane. Polyurethane gives the sheen that we expect of a finished wood surface.
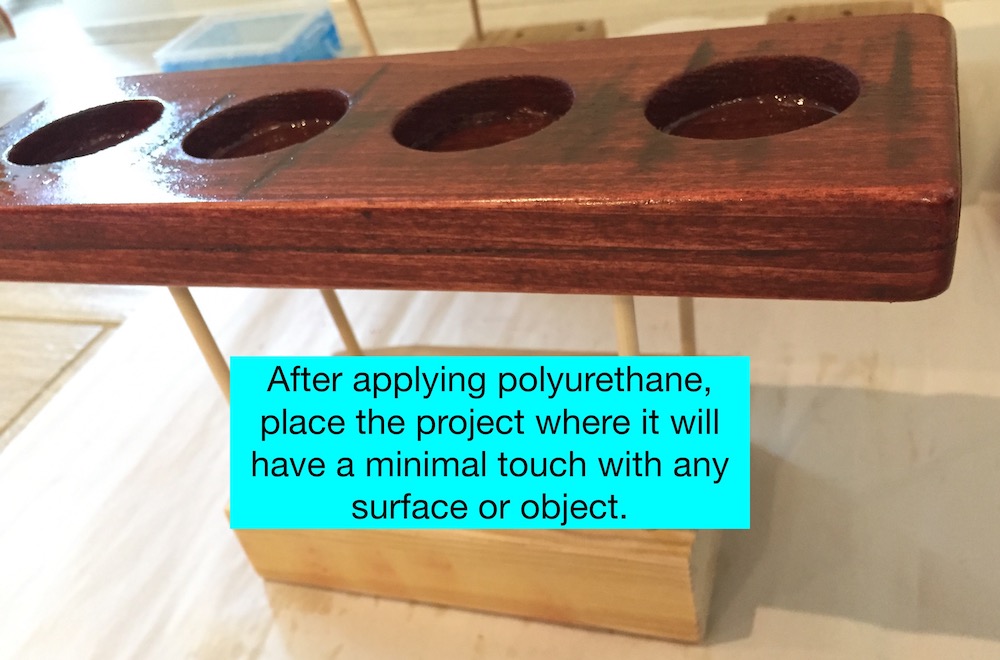
The project should not be touching any surface of the floor or any other object because a touch will leave marks on the project when cured. We placed the project on a platform with four pointy sticks, as shown in the picture below. Handyman made this platform using a piece of wood and some barbecue sticks for drying small wood projects. The polyurethane layer cured for twenty-four hours on the platform.
We used mineral spirit to clean the paintbrush after the application of polyurethane so that we can reuse the paintbrush later.
Light sand
We decided that we will give two more coats of polyurethane. Before applying the second coat of polyurethane, we lightly hand-sanded the project using 320 grit sandpaper. After sanding, we removed dust using a clean rag.
Repeat light sanding and application of polyurethane for a nicer finish
We then applied the second coat of polyurethane. We let the project cure for twenty-four hours. Then, we lightly hand-sanded the project, removed dust, and applied the third coat of polyurethane. We let the project cure for another twenty-four hours. The project is then ready to be used.
Felt pads
Optionally, you can put felt pads under the candle holder so that it moves softly on concrete surface.
What will we do differently if we make it again?
We learned about lacquer recently. Next time, we will use lacquer instead of polyurethane because lacquer does not require sanding in between applications. Moreover, the wait time between applications of lacquer is only a few hours. Therefore, we will be able to complete a project in just one weekend.
Our random orbit sander is cordless and requires a battery, which is rechargeable. Sanding hardwood requires more battery-power than sanding softwood. Recharging a battery requires time in case the battery dies in the middle of sanding a project. Keeping several battery packs is a good idea. The use of a corded sander instead of cordless is probably a better choice.
Colncluding remarks regarding this woodworking DIY
Hopefully, the article explains everything to remake a wooden tea-light candle holder. Please let us know any feedback you may have or if you have any question.
Have a wonderful weekend ahead! Have a great Valentine’s day.
From a Family Blog: Settle in El Paso
Other relevant articles on woodworking


Subscribe to receive notifications on our new posts.
As the largest total pallet management services company in the U.S, Prime360 is driven to keep our customers products moving throughout the supply chain effectively and efficiently. We provide our customers with everything from sustainable pallet management and analysis to insightful technology, material/financial flow optimization and more. Visit for more https://prime360.com/
As the largest total pallet management services company in the U.S, Prime360 is driven to keep our customers products moving throughout the supply chain effectively and efficiently. We provide our customers with everything from sustainable pallet management and analysis to insightful technology, material/financial flow optimization and more.
Nice work.
We are glad that you liked it. Wish you a wonderful weekend.
I really like the rustic look of this one. Awesome to see how this project came to together for you and how we could make it too! I think it would be a beautiful gift too. Sharing on Pinterest and Twitter today 🙂
I am so glad to hear that you liked the look of the tea-light candle holder. I agree that it can be a gift item. Thank you for the social shares. Wish you a wonderful week.