


Moreover, sanding is fun! The learning curve of sanding is not steep. We find sanding to be somewhat addictive. Possibilities are endless when you know how to sand. You have a ten-year-old breakfast table — sand — stain — and seal it — you have a piece of brand new furniture. You want a strong wooden side table at a reasonable price. Buy a piece of unfinished furniture, then sand — stain — and seal.

You want a gorgeous looking dining table but want to keep the price low? Please keep an eye on craigslist.org. Once you get one under a hundred dollars, buy it, sand — stain — and seal — you have an awesome dining table, which looks brand new.
You have made a coffee table with a concrete top. Is the surface a bit coarse? Sand it, then apply a concrete sealer or even Shellac. You have a unique coffee table.
As said before, possibilities are endless when you have sanding tools and you know how to sand. A few tips on how to sand like a pro are provided in this post.
The post contains affiliate links. This means we will receive a reward if anyone uses the links to purchase anything. There will be no additional charge at the buyer’s end.
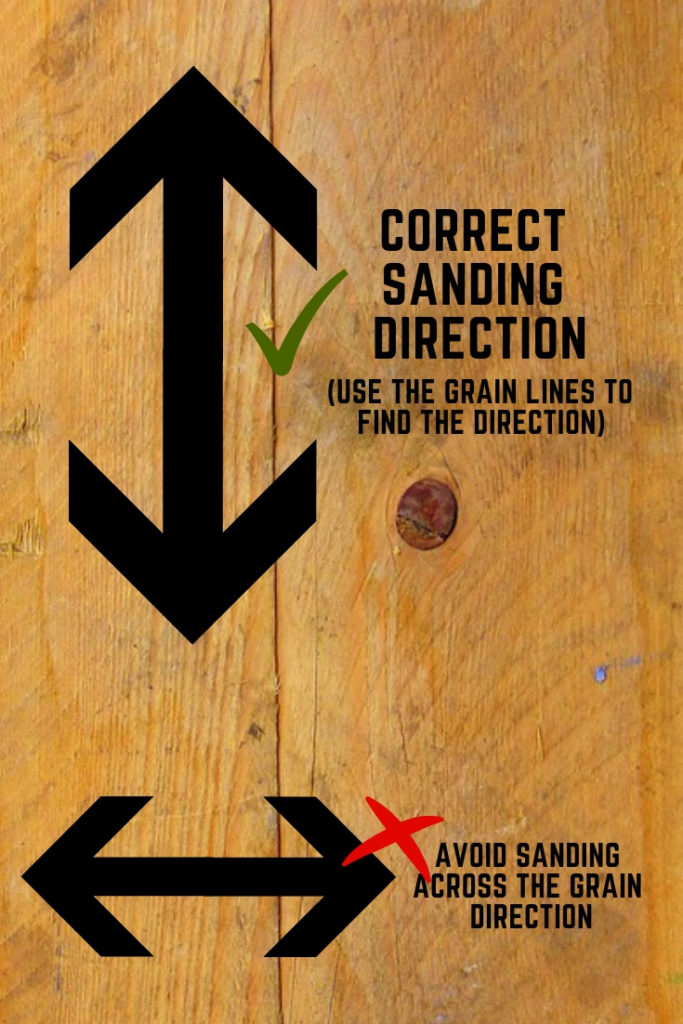
Sand in the direction of the wood grain
Sanding in the direction of the wood grain will give a fine surface, especially if you are hand-sanding. Because hand-sanding is slow, you might see visible scratch marks if you sand across the grains instead of in the direction of the grain.
If you use a power sander like a random orbit sander, then probably the direction does not matter much. We do not see much difference between sanding toward and across the wood grain when using a random orbit sander.

A random orbit sander revolves the sandpaper so quickly that the pressure is evenly distributed on a large part of the wood no matter in which direction we are moving the sander. We still prefer to move the random orbit sander toward the direction of the grain, especially when the wood pieces is thin. For a thin flat wood (like lath), it is essential to sand in the direction of grains when using the random orbit sander because otherwise, the wood strip might break apart.
The use of grits in sanding
We used low-grit sandpaper when we first started woodworking. Low-grit sandpaper made the rough surface smoother but the finish did not look professional. 🙁 After doing some research, we realized that we did not use the grits properly.
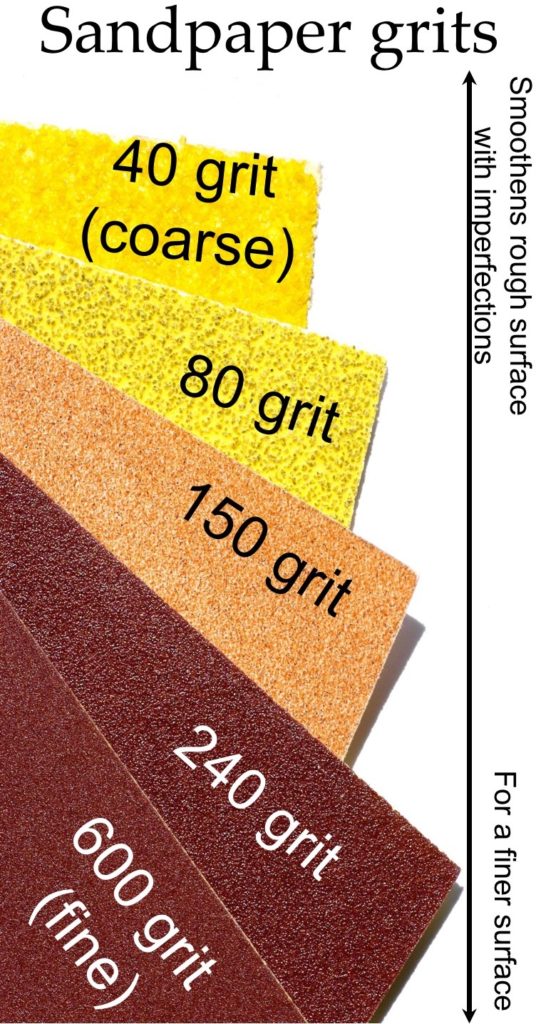
We used 80 grit sandpaper, which is suitable to make the rough surface smoother. After using the 80 grit sandpaper, we should have used 120 grit, and then use 220 grit sandpaper to make the wood piece much much smoother. The smaller the grit is the coarse the sandpaper is. The use of multiple grits one after another, from low grit to high grit, gives the wood piece the professional looking smoothness we were expecting.
If we make any furniture piece for the living room, we would first sand it using 80 grit sandpaper, assuming that there are imperfections here and there. Then we will sand the wood with 120 grit sandpaper. We will use a 220 grit sandpaper to make it smoother after sanding with the 120 grit sandpaper. Finally, we will use a 360 grit sandpaper if the furniture is major attention of the living room.

Sandpapers (commonly called disks) of a random orbit sander are also available with different grit numbers. Just make sure that you are purchasing disks of the size that will fit nicely with your sander. Some sanders have vacuum cleaners that aid in dust collections when sanding. For such sanders, the sandpapers need to have a number of holes. Make sure that the disks you purchase have the necessary number of holes.
When to use hand-sanding and when to use power sanding

Most of the times we use power-sanding using our random orbit sander. We especially use power sanding after cutting the lumber into pieces so that we can get rid of the imperfections quickly.
Wood joints are not always perfect. Extra edges are common. Sanding the borders near the joints gives a better look to a product. Excess glue outside the joints after curing can be sanded too using a random orbit sander.
It is hard to reach the corners of joinery since the sandpaper of a random orbit sander is circular, especially where there are right angles of three surfaces in the same corner. Hand-sanding becomes inevitable in such cases.
Also, it is better to hand-sand lath instead of using a random orbit sander because a thin strip of wood breaks frequently due to the strong centrifugal force unevenly distributed across a small wood surface.
In the finishing phase, we prefer to hand-sand, using a high-grit (above 220) sandpaper, before applying the second coat of polyurethane.
Safety during sanding
Proper precautions should be taken when using any power tool. For sanding, protective glasses, masks, and gloves are essential. Protective glasses will prevent eye-injury due to wood-splinters. Masks will protect lungs from inhaling the wood-dust. Gloves will protect the hand. Among these three itms, we feel that the protective glasses and masks are something that should never be avoided while using a random orbit sander. For hand-sanding — a mask sounds sufficient.
Concluding remarks
Sanding is a major activity of woodworking. Knowing how to sand wood provides the flexibility to purchase inexpensive and unfinished furniture or even some old pieces. Do you have any tips regarding sanding, or in general, about woodworking? Please share any tips with us in the comments section below.
Have a wonderful week!
Subscribe to receive notifications on our new posts.
These are really amazing woodworking tips. I love to do DIY projects with wood and this article is really helpful for me. Thank you for sharing it.
Good article! It will help many people. Keep it up.
Thank you for visiting our website and the kind words. Best regards.
Great to know about home sanding and it will certainly save people money! We are doing some renos and I hope to be more DIY advanced soon 😉
Wow yes, after the renovations you will know many things! Each renovation is a confidence booster too for doing more DIY projects. Thank you for visiting and commenting! Have a wonderful weekend.